How do I add the campaign audience?
The audience setting lets you choose the people you want to send conversations to.
You can set your campaign audience by:
- Uploading a CSV file with a list of specific people
- Copy and paste a list of email addresses
- Targeting a specific group in the organization using attributes
- Distributing your audience based on recent participation
- Including everyone in your organization
For conversations that are set up to send across multiple days, you also have the option to distribute conversation sends evenly based on a specific group. This approach ensures that conversations are delivered to a diverse range of participants.
Organizations with minimal support intervention and configuration allow for only Email & CVS list. Email list should include Firstname Lastname <email@domain.com> format. CVS list should include three data points: First name, Last name, Email address. 👉 To important custom attributes, phone numbers, or additional contact methods please contact us at support@joyoushq.com.
1. Upload a CSV file with a list of specific people.
- Joyous will analyse the file to see if further input is needed:
- If the file has no issues, the file will be added and the audience count will be updated automatically;
- If some people cannot be added to the audience (people not found in Joyous, people who are deactivated, duplicate people) a dialog will display a summary of affected audience members:
- You can download CSV files listing the affected people for troubleshooting;
- If the uploaded CSV audience file contains enough information, you will have the option to add new people as new Joyous users as part of the audience upload:
- The CSV file must include the following columns, and the column headers must match your organization's people data configuration:
- Given Name, Last Name, Employee ID (if configured), at least one of Email or Mobile Phone.
- Any missing columns from your organization's people data configuration will be listed in the dialog.
- The CSV file must include the following columns, and the column headers must match your organization's people data configuration:
- Click Continue to finish processing the file - do not close the window or navigate away while the file processing is in progress.
- If Joyous cannot automatically match people in the uploaded CSV file to Joyous users, a dialog will display to chose a Column to match:
- Select the unique identifier for your people from the list of columns in the dropdown (employee id, email).
- Click Continue.
- After the file has been processed, the audience count will be updated, and the successfully uploaded CSV file name will be displayed:
- To remove the CSV audience file, click the 'Remove' (🗑️) icon. The Upload CSV area will re-enable.
- Click Save to confirm audience setup.
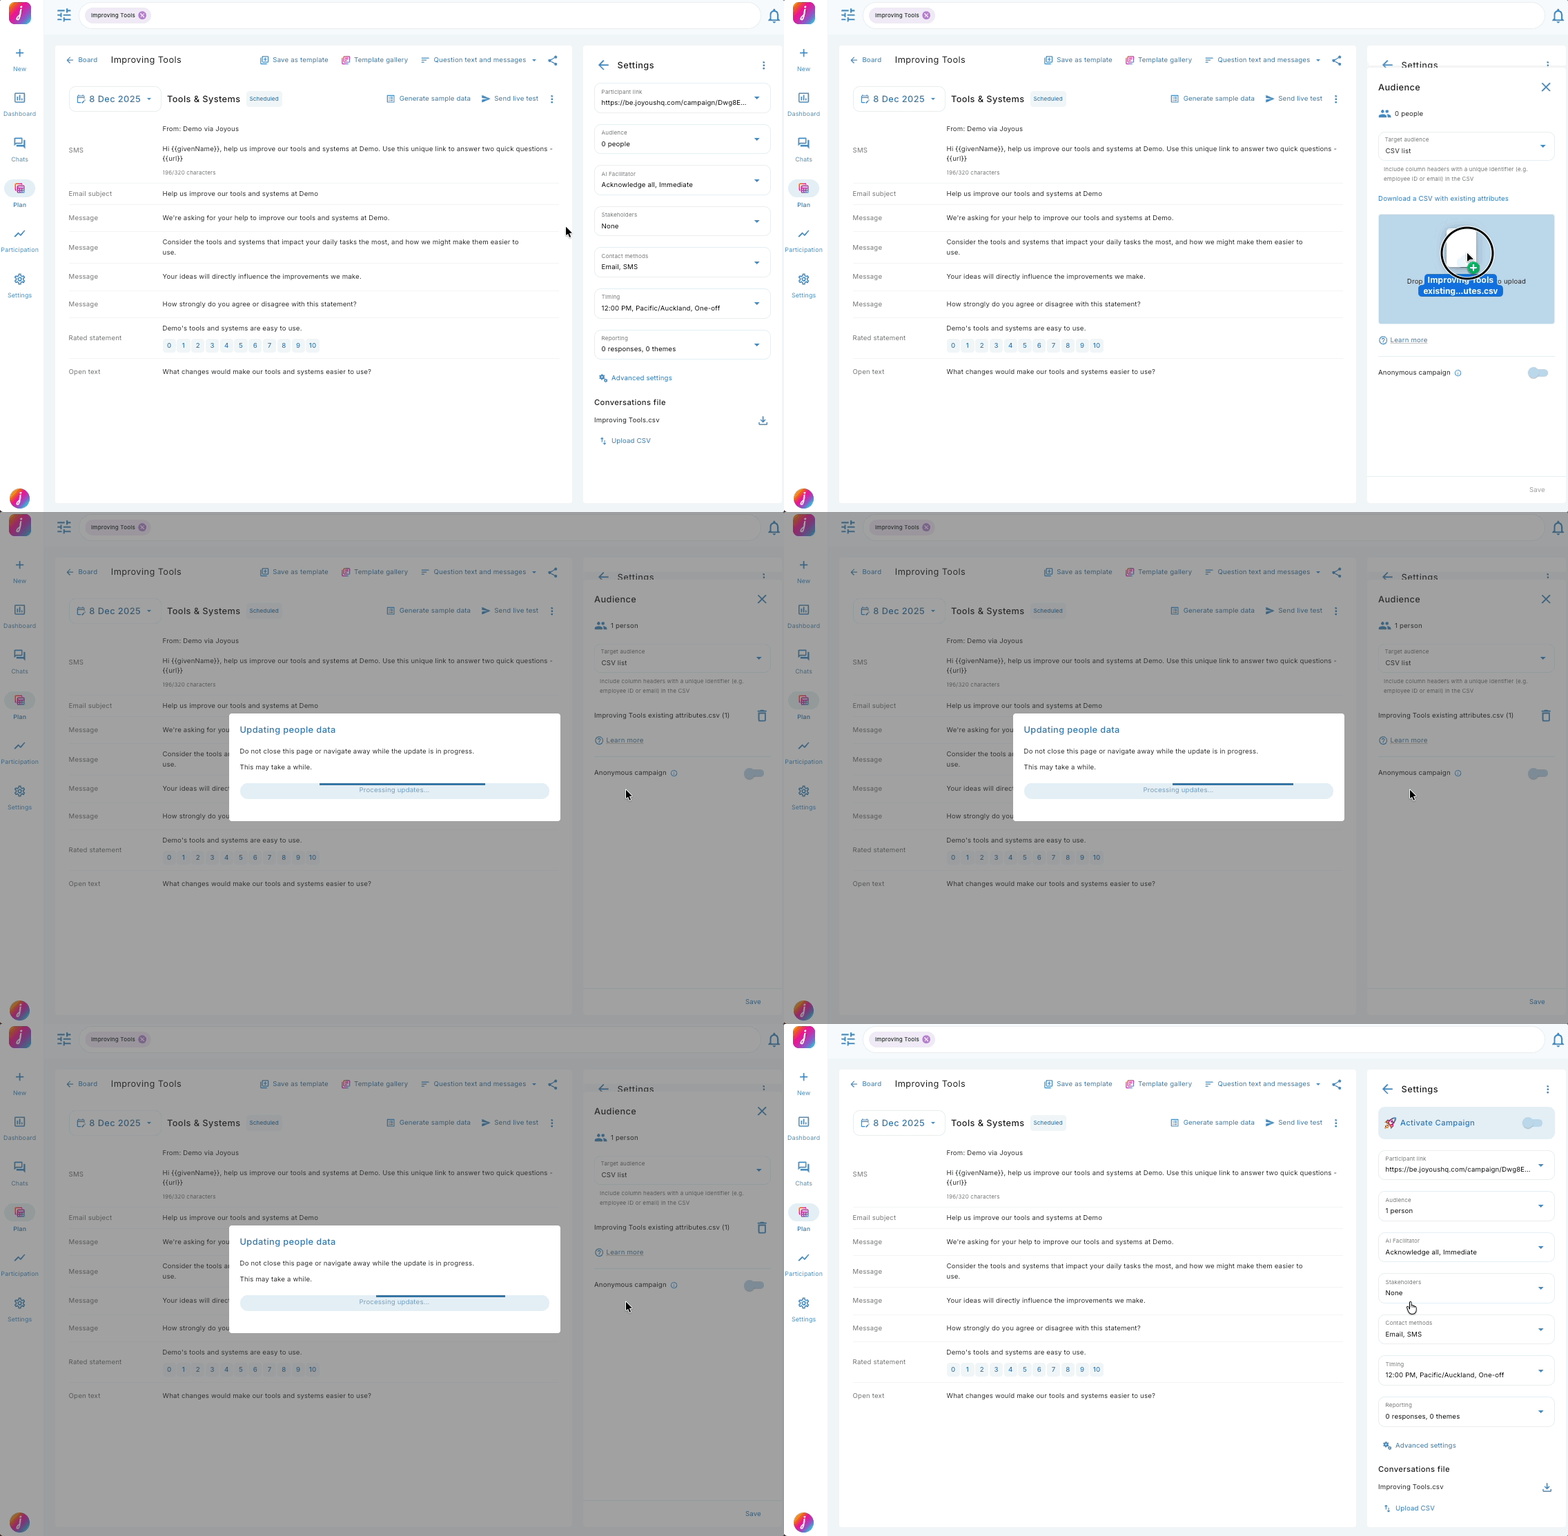
We strongly recommend downloading the CSV template with the existing attributes from your organization's people data configuration, and matching your audience file to the same structure. The template can be downloaded from the Audience configuration area for any campaign where the Target audience is set to CSV list.
The CSV file must have the unique people data identifier that is used in Joyous (e.g. email, employee ID, mobile number, etc). Make sure that this unique identifier column has a header name.
2. Copy and paste a list of email addresses.
- Select the Email list option from the 'Target Audience' dropdown menu.
- Copy a list of email addresses in the Emails input:
- The list can be comma-separated, or each email on a new line.
- Joyous will display how many email addresses could be matched to Joyous users.
- Click 'See who is missing' to download a CSV file listing people who could not be found.
- Click 'Save' to confirm audience setup.
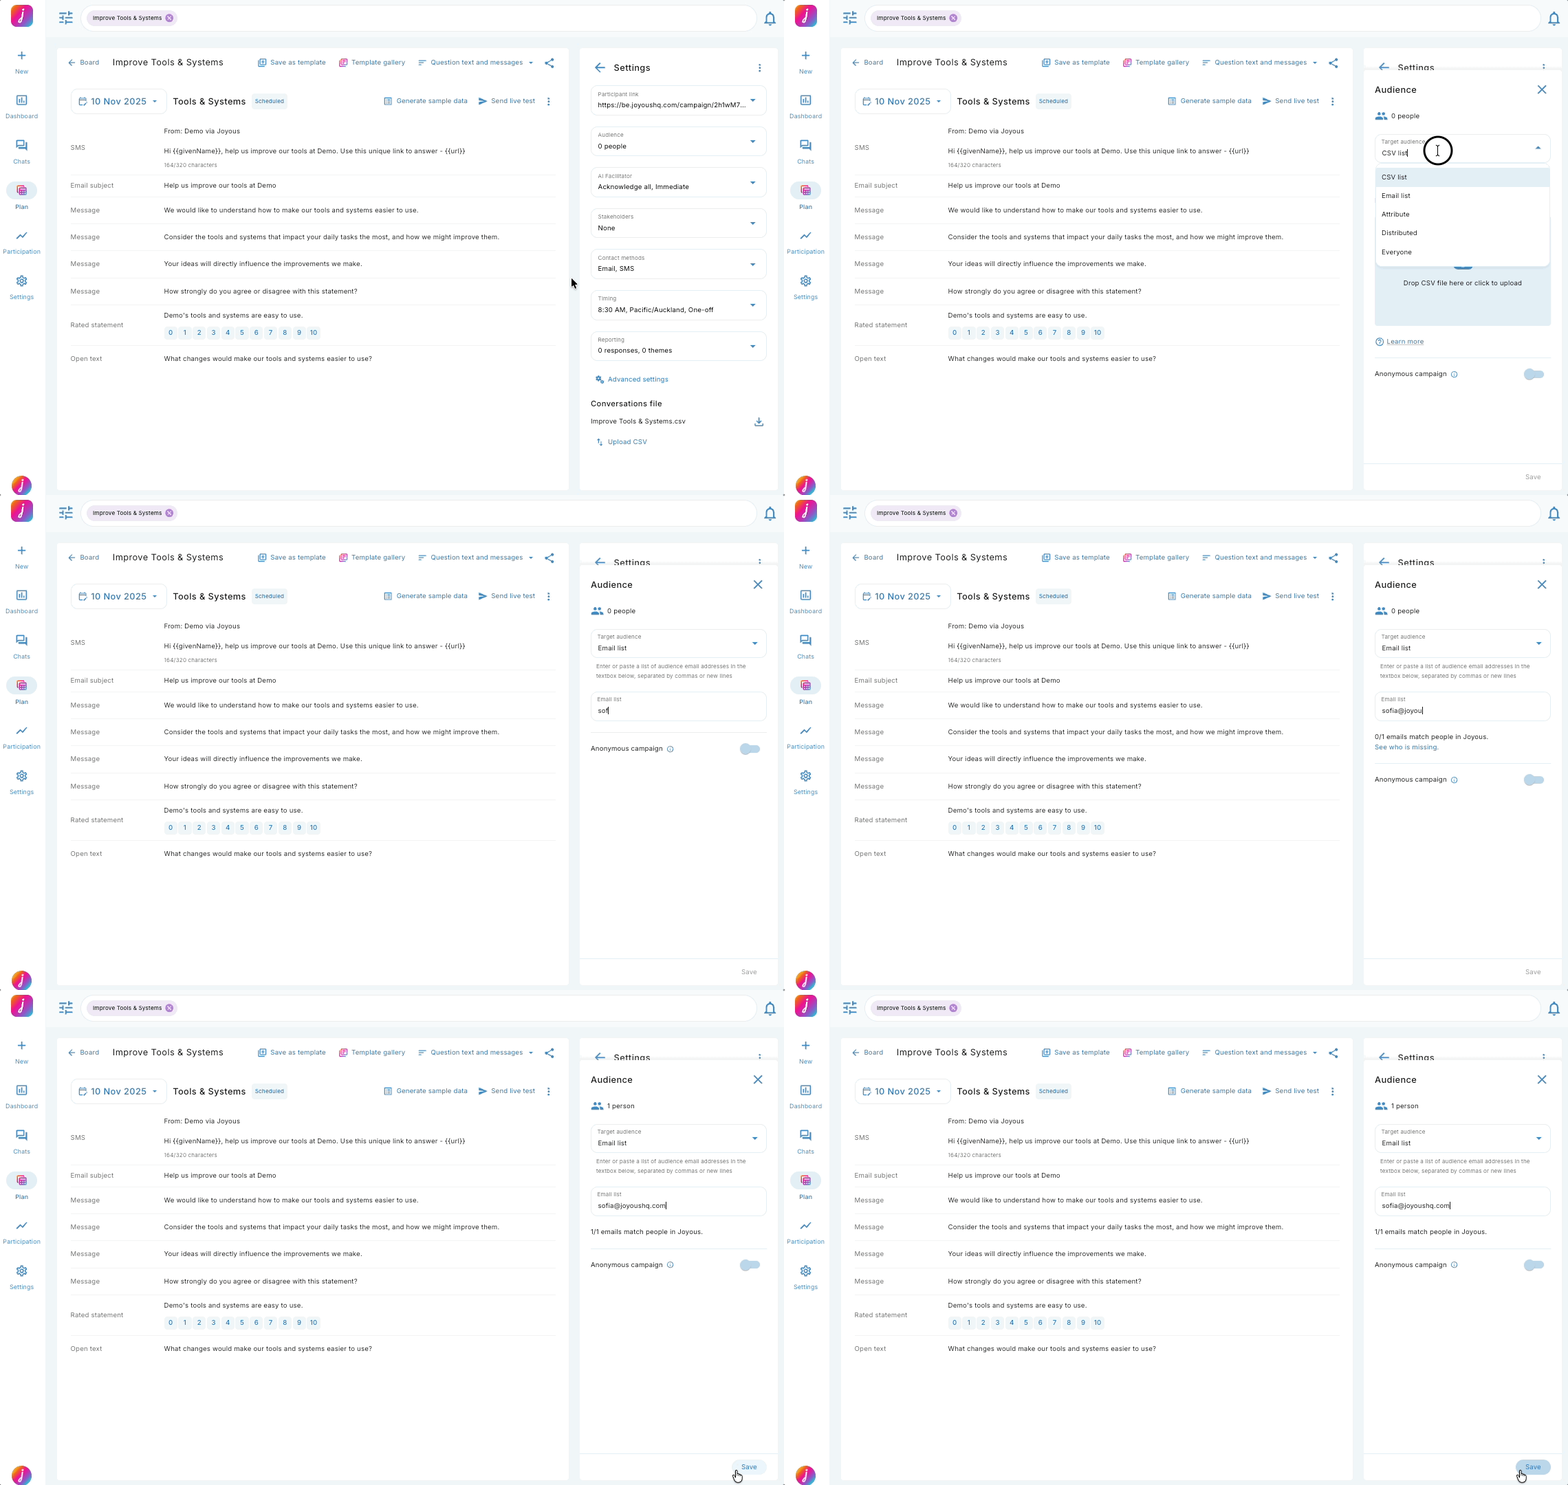
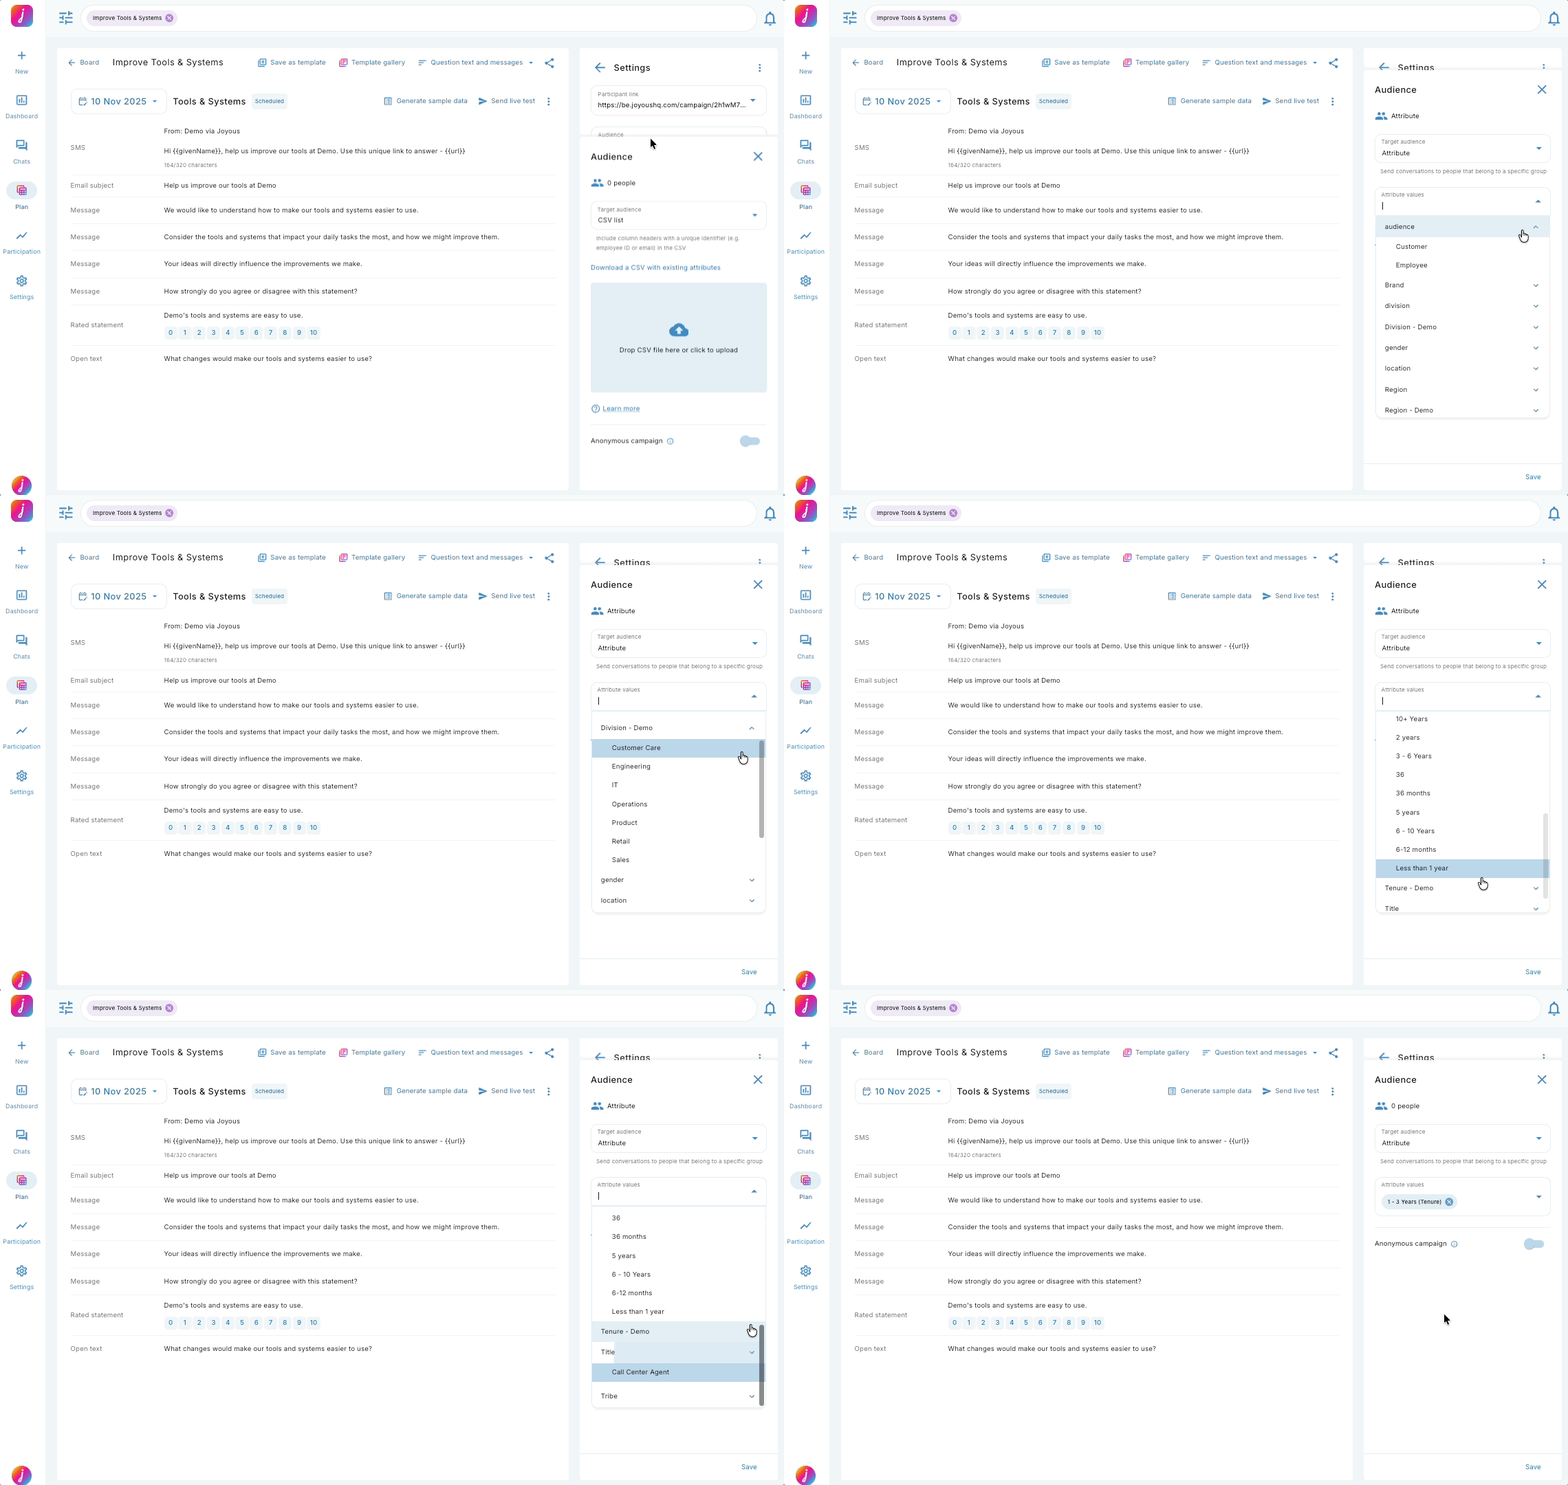
3. Target specific group using the Attribute option.
- Select 'Attribute' from the 'Target audience' dropdown.
- Type an 'Attribute name' or 'Attribute value' in the input field. Click on the 'Attribute value' to select.
- You can also select the 'Attribute value' from the dropdown menu.
- You can select multiple 'Attribute values' from different Attributes that are set up in Joyous for your organization.
- Select the attribute you wish to spread your send by.
- Click 'Save' to confirm audience setup.
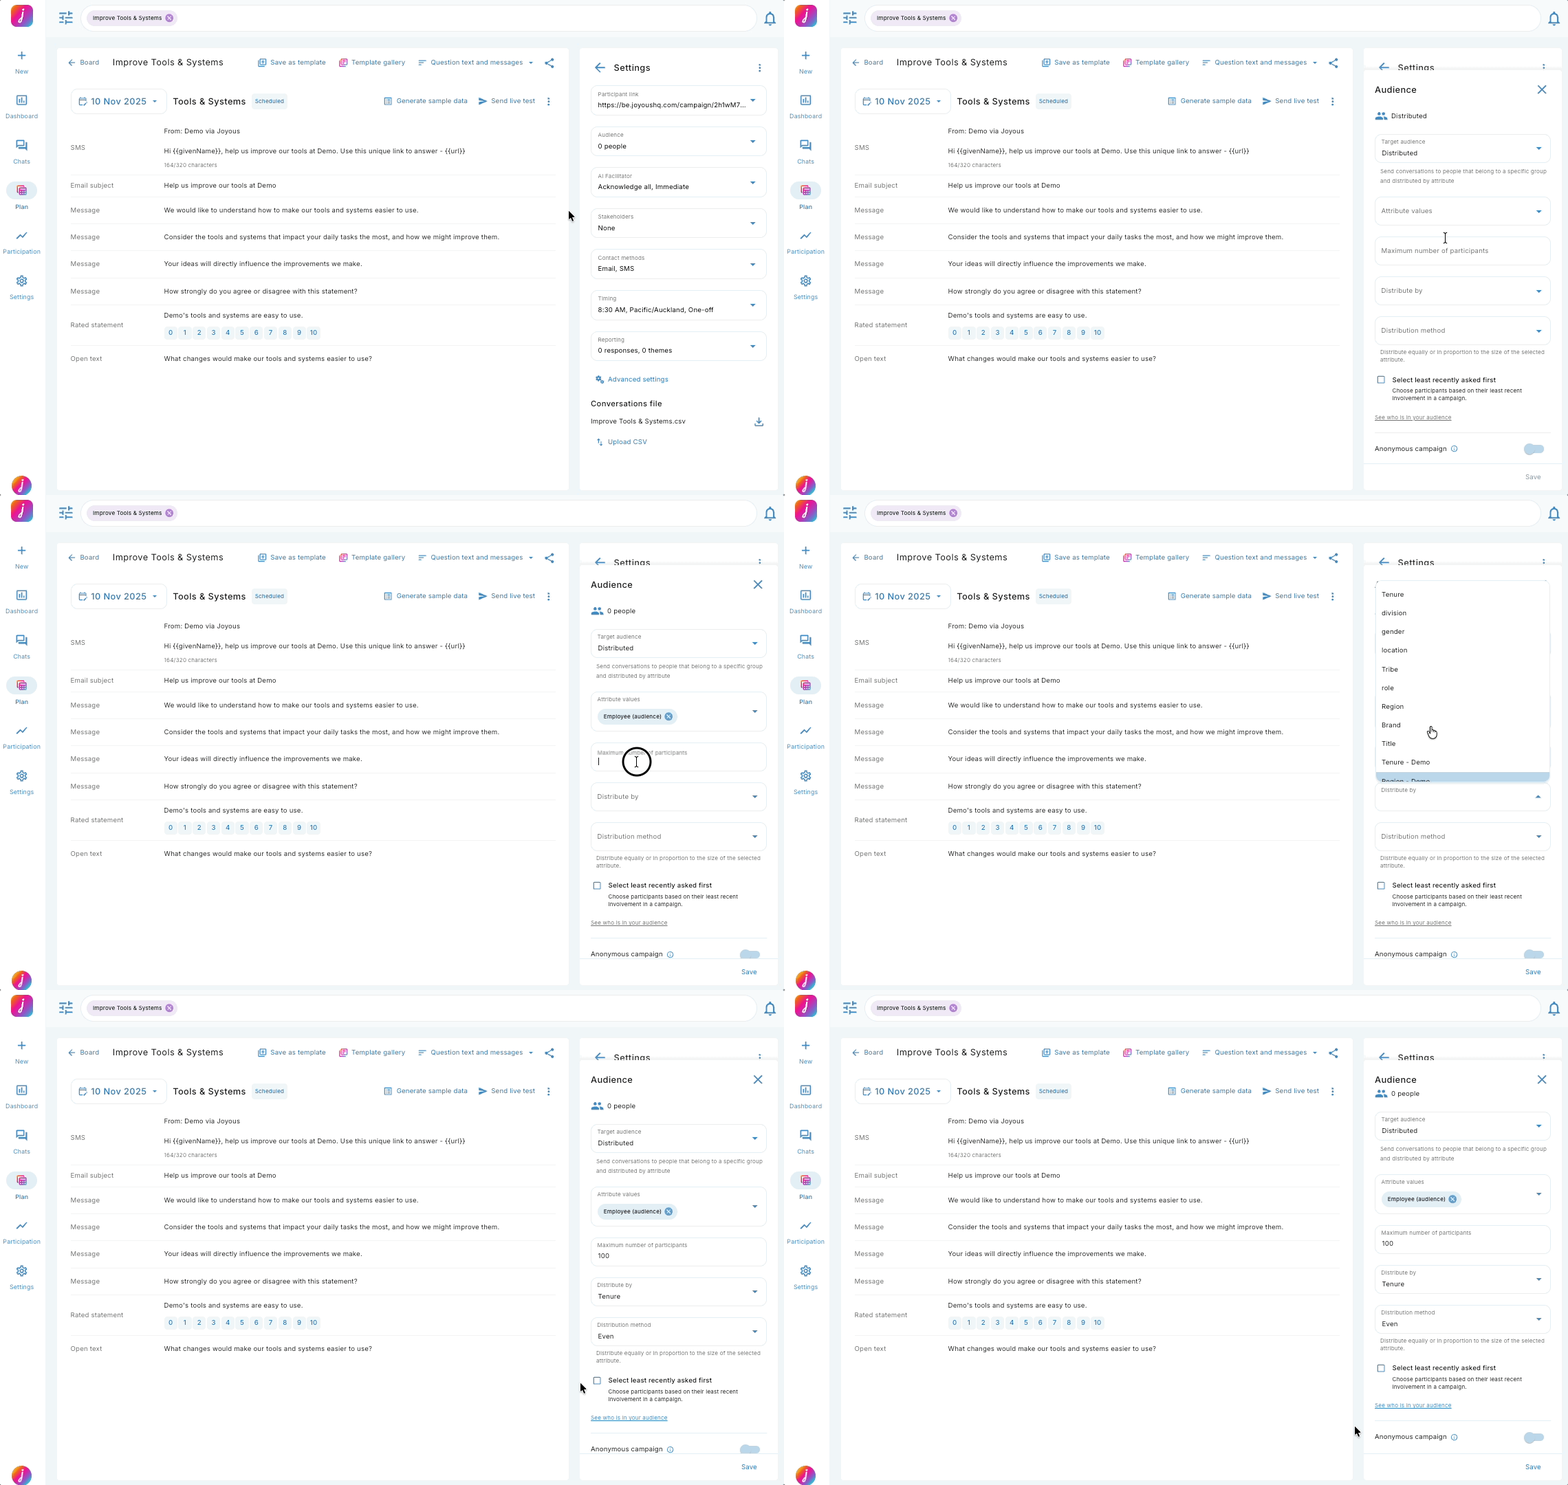
4. Distribute your audience based on recent participation.
- Select 'Distributed' from the 'Target audience' dropdown.
- Type an 'Attribute name' or 'Attribute value' in the 'Attribute values' field. Click on the 'Attribute value' to select.
- You can also select the 'Attribute value' from the dropdown menu.
- You can select multiple 'Attribute values' from different attributes that are set up in Joyous for your organization.
- Type the maximum number of participants you want in your campaign audience in the 'Maximum number of participants' field.
- Click the ' Distribute by' dropdown and select the attribute you wish to distribute your audience by.
- Click the checkbox if you wish to select participants based on their least recent involvement in a campaign.
- Select the attribute you wish to spread your send by.
- Click 'Save' to confirm audience setup.
5. Include everyone in the organization.
- Select 'Everyone' from the 'Target audience' dropdown.
- Select the attribute you wish to spread your send by.
- Click 'Save' to confirm audience setup.
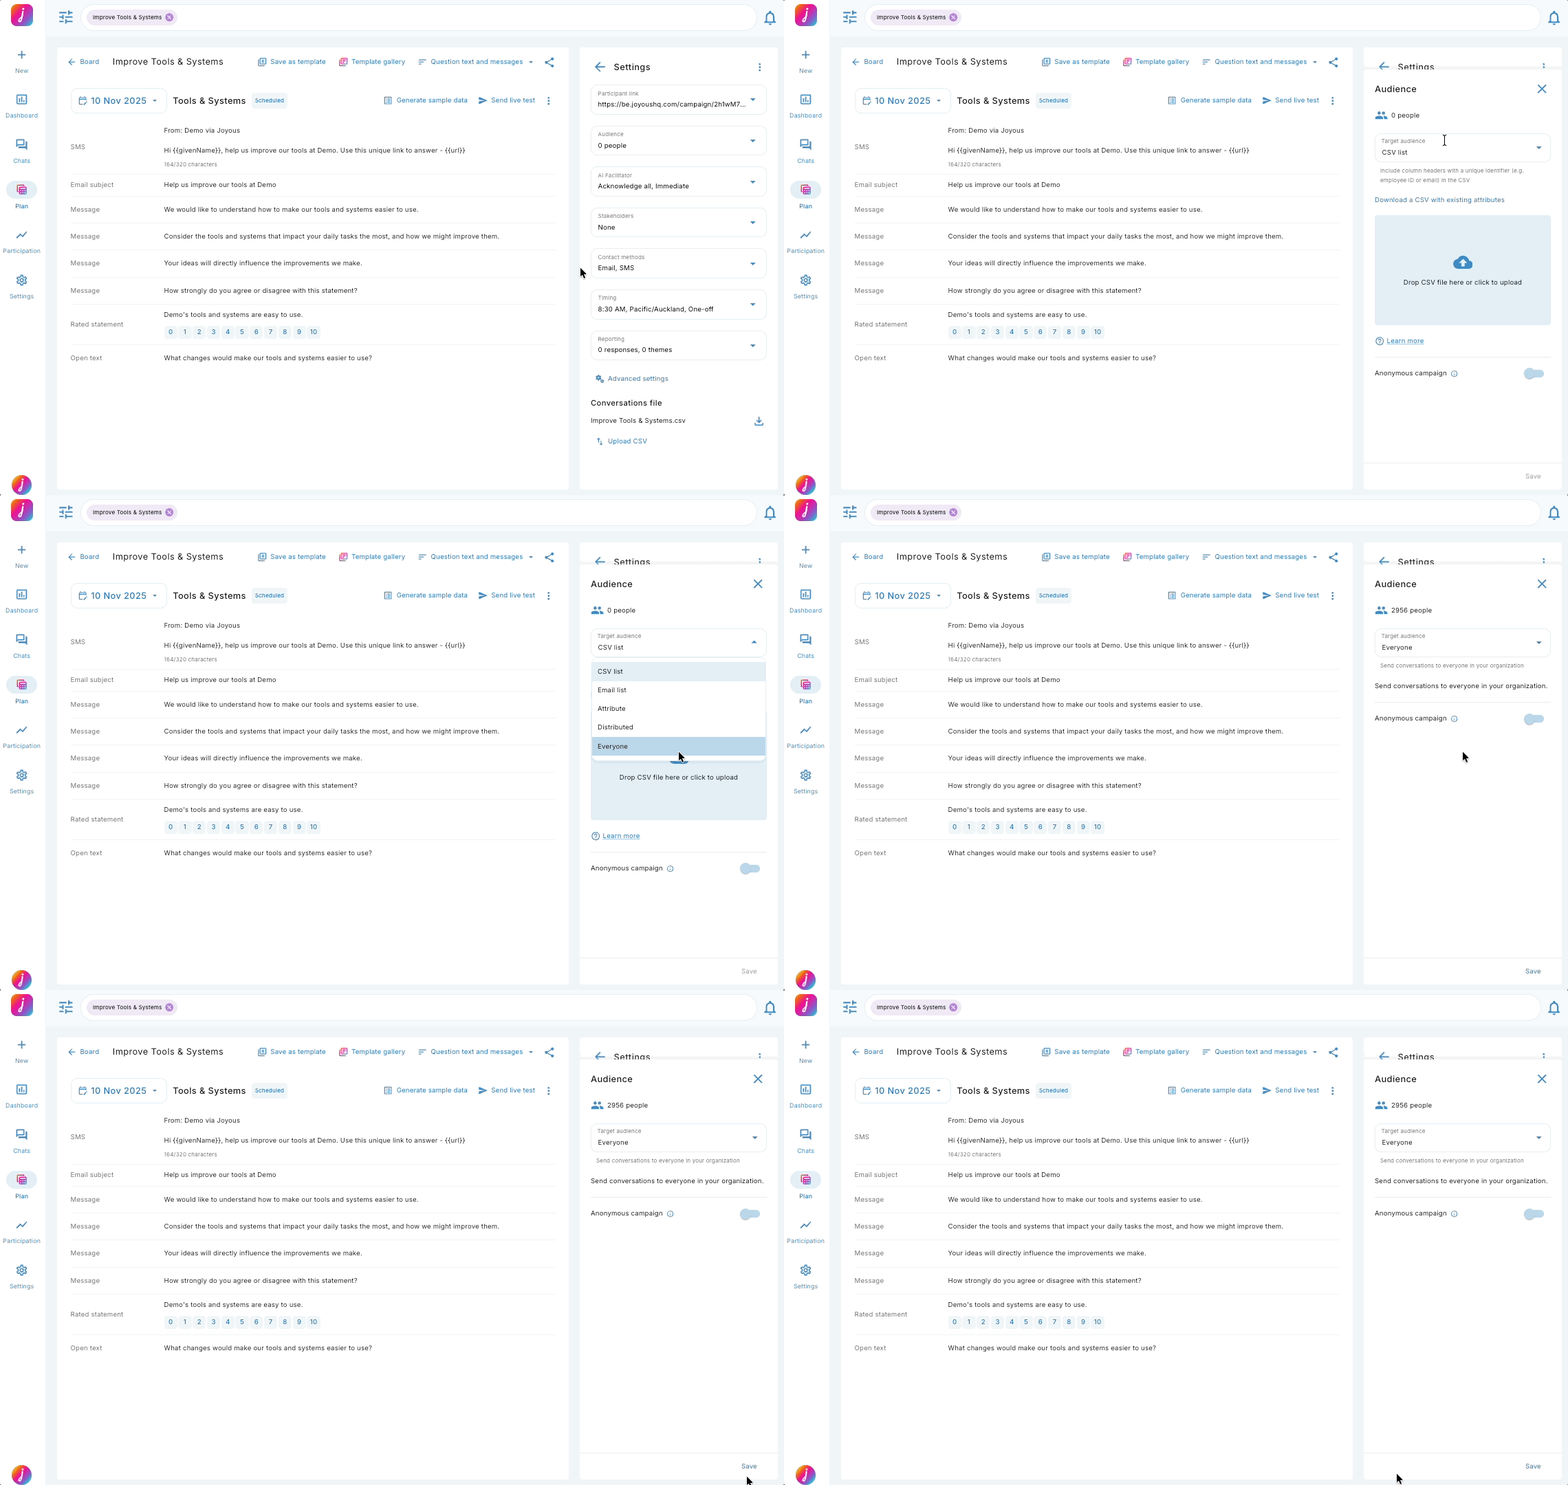
⚠️ Sending to everyone in the organization is potentially a large number of participants. Please ensure that the campaign is designed for this option.
Additionally, you might want to spread the conversation send over multiple days to give the responders the time to reply to feedback.